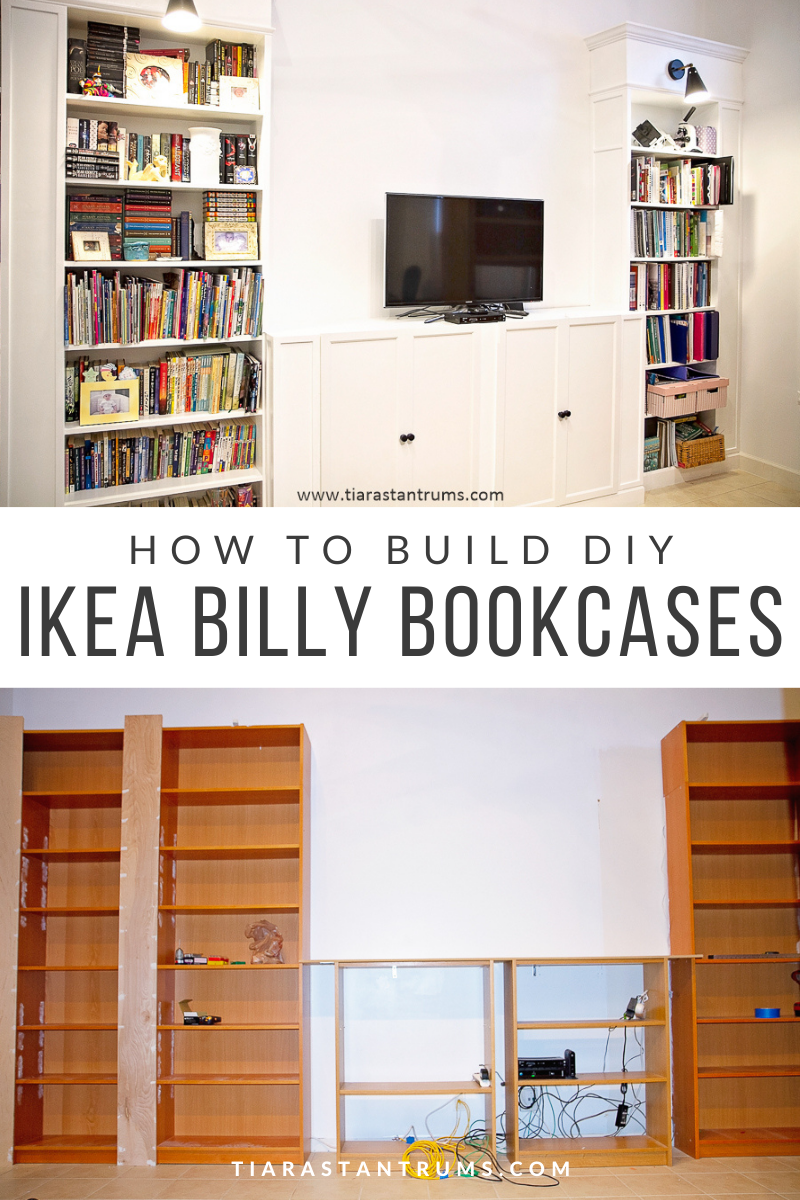
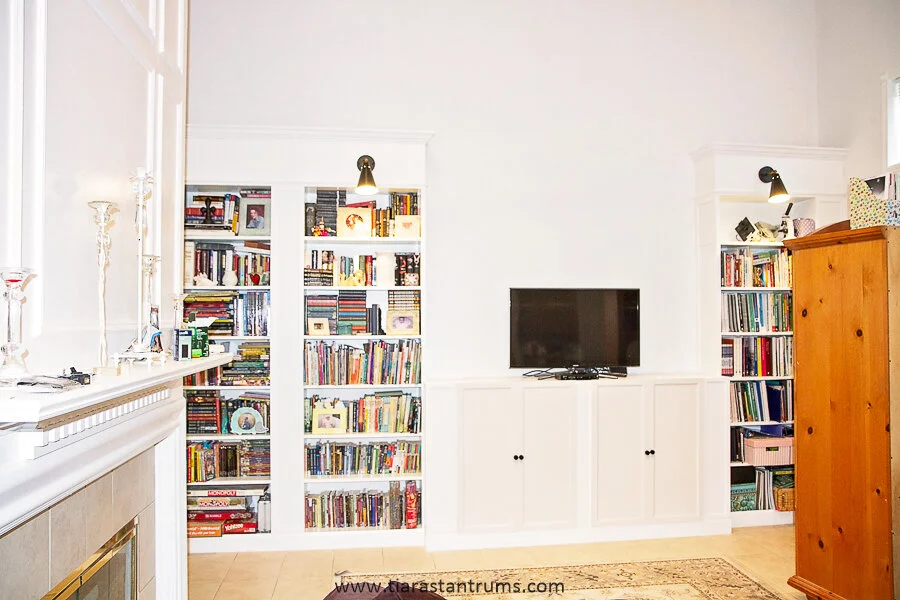
HOW TO MAKE IKEA BILLY BOOKCASE BUILT-INS
These simple, step-by-step instructions make it easy to create gorgeous IKEA Billy built-in bookshelves. Turn existing old brown IKEA Billy Bookcases into white Built-In Bookcases in your home. Here is a full tutorial on my newly constructed DIY custom built-in bookcases with remote control sconce lighting.

I have had these brown IKEA Billy Bookcases in my home for over 20 years! They are so old that IKEA no longer even sells this color option for Billy Bookcases. When we moved into our home 20 years ago, I really (REALLY) wanted a full wall of built-in bookcases. The builder quoted up a price of $10,000 and my husband promptly vetoed that, so we purchased the IKEA Billy Bookcases instead. I liked them well enough, but when we purchased them, I wanted white and my husband said no way, so brown was what I ended up with. They worked well enough for me. I used these Billy BOokcases lovingly through all our years of homeschooling.


This past school year was my very last year of home educating, so this summer I decided I was turning our schoolroom back into an actual living space in our home. Our schoolroom was in our sunroom. The bookcases have always been in the sunroom, but I decided I wanted a built-in now after settling for the past 20 years. I headed to Pinterest to see if I could build a bookcase myself. I was inspired by the IKEA Billy Bookcase hack from 11 Magnolia Lane.


My sunroom is much larger than the room she used to transform her bookcases, so my setup is a bit different than hers. I used her instructions as a starting point. I really wanted to build a platform as she did for her bookcase, but my husband refused to allow me to built one. So, I simply used the IKEA Billy Bookcases as they were, but moved them around a bit to use the entire wall space.

Billy Bookcase Built-In Hack


How to Make IKEA BILLY BOOKCASE Built-Ins
Step 1: Calculate the number of Billy Bookcases you need to purchase.
Length of the wall in INCHES / 31″ = Number of Billy Bookcases
I measured the length of the wall and then divided them by 31″ (the width of one billy bookcase). We needed 5 bookcases. So I eliminated the corner unit (which is basically a useless piece of furniture and I don't recommend purchasing this one at all) and the small CD unit as well (which went into the trash bin and IKEA doesn't even sell it any longer). I had two shorter Billy Bookcases in our basement in the playroom that we were no longer utilizing and I moved those upstairs into the sunroom. So, I had no expensive outlay for any of the bookcases at all.
For my wall, I used two (2) 79.5-inch by 31.5-inch Billy Bookcase, one (1) 24.5 inch by 79.5-inch Billy Bookcase - (that IKEA does not even make any longer), all with the 14 inch by 31.5-inch extensions, and two (2) 41 3/4 inch by 31.5 inch Billy Bookcase and four (4) 15 3/4x38 1/4 OXBERG white doors in the middle section for the two 41.75 inch Billy Bookcases. The Oxberg doors fit perfectly on the Billy Bookcases.
My ceiling is 18 feet so, so there was no way we were going to be able to build a built-in bookcase that high.
Step 2: Assemble Billy Bookcase per IKEA Instructions
IKEA instructions are always very simple. My best recommendation is to not manhandle the screws and wood. These are all particle boards and if you use all your brute strength, you will screw through and make holes. My husband never listens to me and I always have repairs. So, be gentle! All our bookcases were already assembled.

Step 3: Spacing Your Billy Bookcases
How far to space the bookcases apart: To estimate how far to space the bookcases apart along the selected wall, simply measure the length of the room. (I measured without the flor boards in place as I had already removed them from the walls). Then subtract the total width of all the Billy Bookcase you are going to be utilizing in your rooms and divide that answer by how many spaces you would like in between. This will provide the distance to space each of the bookcases.

For instance, if you are going to use FOUR bookcases, you will likely want FIVE spacers. I used SIX bookcases and I have SEVEN spacers built into this built-in bookcase along my wall.
(Length of the room – Combined width of the bookcases) / spacers = Space between each bookshelf
Example: 4 @ 31.5″ wideBilly Bookcases + 1 @ 24” wide Billy Bookcase = 150″ combined width
Wall Length = 198″ (16.5 feet)
(198″ – 150″) / 7 = 6.85″ spaces between each bookshelf
ROUGH ESTIMATE: I did not space each shelf 6.85 inches apart because of the different sizes of Billy Bookcase I was utilizing. I put the 24-inch by 79 inch Billy bookcase first, next I lined up the 31.5 by 79 inch Billy bookcase, then I centered as best as possible the (2) 41 3/4 inch by 31.5 inch Billy Bookcase and lastly I used another 31.5 by 79 inch Billy bookcase. The bookcases next to the walls were moved out 9 inches. The two smaller bookcases in the middles were spaced 5 inches apart and the rest of the bookcases were spaced approximately 8 inches apart.
If your wall doesn't allow for spacers in between your Billy Bookcase, simply place them all directly next to each other.
Step 4: Anchor Billy Bookcases to the Wall

Once you have your Billy Bookcases all spaced to exactly where you would like them - it is time to anchor them to the wall. Included in the purchase of the bookcases is a bracket to screw to the wall. DON’T SKIP THIS STEP, especially if you have children. You really need to make sure the bookcases are secured to the wall. My husband anchored these bookcases to the studs in the walls, so these bookcases are not going to tip at all. We’ve had these bookcases anchored to the studs for 20 years so I can attest to the fact that they will not tip if your kids climb them.

Step 5: Add Wood Spacer Covers
I went to my local Home Depot and had them cut 2 (TWO) 4’ by 8’ plywood underlayment board lengthwise for me. Not all Home Depot will cut to your specifications. Thankfully, I have only had a couple of people tell me no. I simply head to another Home Depot and ask there if I get a no.

I asked for these specific cuts for my wall:
4- 8″ wide planks (8 inches by 96 inches)
4- 9″ wide planks (9 inches by 96 inches)
2 - 10” wide plank (10 inches by 96 inches)
I was left with two 4-inch wide planks.
I also purchased some 1 x 2 boards and cut them all to my specific measurements to add to the top of all the frames for lighting panels. Simply nail in the 1 x 2 boards along the edges of the extenders to create a location where you will be able to nail in your wood planks on the top.


Simply take your cut wood planks (from the cut underlayment board) and use your nail gun to place them on your spacers. I secured the 9″ wide vertical panel to cover the space between the bookshelves and the wall. I secured the 8″ wide vertical panel to cover the space between the individual bookshelves. I cut sections for the smaller bookcases to size and secured these vertical panels to cover the space between the bookshelves in the middle. I then secured the 10″ wide planks to the top of the bookcases, overlapping the front by an inch. I cut the remaining sections and then secured the side pieces which measured about 11.5″.

ADD WOOD TABLETOP
We wanted to cover up the lower bookcases with a full piece of wood to make it look really seamless. We had a piece of MDF board cut the exact length we needed. We secured it in place with wood screws.
Step 6: Cover All The Nail Holes and Gaps

The Billy Bookcase is lined with predrilled holes to customize shelf heights. I didn’t want these gaps and holes to show on the finished piece so I went through and filled all the gaps and holes with spackle. I also filled in all my nail holes from the planks. Don’t forget to sand!
Step 7: Prime Bookcases and Shelves


Make sure you prime the top and the bottom of each shelf because you will be able to see both sides once the shelves are up. If you already have the white Billy Bookcases, you will only need to prime and paint the wood spacers. However, we had the tan Billy Bookcases, so I needed to prime and paint all the bookcases, shelves and spacers.

I used INSL-X Cabinet Coat for my primer. This paint adheres to really hard-to-coat surfaces without a primer. The self-leveling properties in this paint are great - but USE thin layers!! I used two coats of INSL-X. After the primer had completely dried (I waited a full two days), I then painted all the cabinets with Bright White door and window frame paint.

Step 8: Add Decorative Moulding, Crown Moulding and Baseboard

To give your new built-in bookcase a beautiful custom look, start adding some moulding. I had already selected a trim that would match the Oxberg doors to finish the planks that I had already installed. I simply cut the small trim with 45-degree angles and nailed it in place to create frames around all the wood plank spacers. This thin flat trim was used along all the outer edges to give a really sleek and smooth finish. I used the same thin trim to cover all the seams between the Billy bookcase and the extension units.


I added crown moulding to the top of the unit for a really beautiful look. I then attached a thin piece of chair rail moulding in between the top of the bookcase and the bottom of the light panel to hide the seams and to add a more polished look. I have this same chair rail moulding throughout the lower half of my home in square and rectangular boxes, so it makes the rooms flow really well together.
I then put in all new baseboards in the entire room, add the baseboards to the front of the bookcase. This makes the bookcase really look like a built-in unit for the sunroom.


Step 9: Caulk and Paint
Caulk everything! Literally, I went through three tubes of caulk to get a really seamless look for our built-in bookcase.
I used two coats of Ultra Pure White Base Semi-Gloss Interior Cabinet and Trim Paint because I wanted a really Bright White and the INSL-X was not giving me that.

Step 10: Remote Control Lights
We needed a bit more light in this room since the ceilings are 18 feet high. We have track lighting on the ceiling and eight windows, but at night, it just seems so dark in here. So I opted to have my husband add some sconce lights to the built-in bookcase. he really did not like this idea, but once they were up - he agreed, it was a great idea.

I couldn't find any sconce lights that were plug-in that I liked, so I opted to purchase sconce lights that were hardwired. My husband converted the sconces into plug-in lights using extension cords that I purchased from Target. The cords are plugged into a power strip that we ran up the back of the built-in bookcase before we secured it to the wall. We simply taped the power strip to the top of the bookcase during all the construction so it wouldn’t fall behind.

You can’t even see the cord at all or the power strip because it is behind the to plank. I purchased a power strip with remote control adapter because I was not going to get a ladder and climb up to turn these sconce lights on and off every day. They work so well with the remote control.

DIY BUILT INS SUPPLIES
(2) 31″ Billy Bookcase
(2) 34” Billy Bookcase
(2) 15″ Billy Bookcases
(3) 31″ height extension units
(4) Oxberg doors
(4) door pulls
(2) 4’ by 8’ plywood underlayment boards
(4) 1x2x8
(1) 3/4 in. x 4 ft. x 8 ft. MDF Panelboard
5/8 in. x 4-5/8 in. Primed Medium Density Fiberboard Crown Moulding
(12) 3/8 in. x 1-1/4 in. Primed Pine Finger-Jointed Stop Moulding
(1) 11/32 in. x 3/4 in, x 4 ft. Basswood Panel Moulding
11/16 in. x 1-3/8 in. Primed Finger-Jointed Pine Wood Baseboard Cap Moulding
9/16 in. X 5.1/4 in. Primed Finger-Joined Pine Wood Baseboard Moulding
2-inch wood screws
brad nails (various sizes)
sanding block/sand paper

In This Post
Bookshelves: IKEA BillyBookcases + extensions
Sconces: Black Wall Sconce
Remote Control Light Plug: Remote Control Adapter
Primer: INSL-X